

New 10 Romantic Couple AI Prompts for Beautiful Cinematic Photography in Autumnal Settings
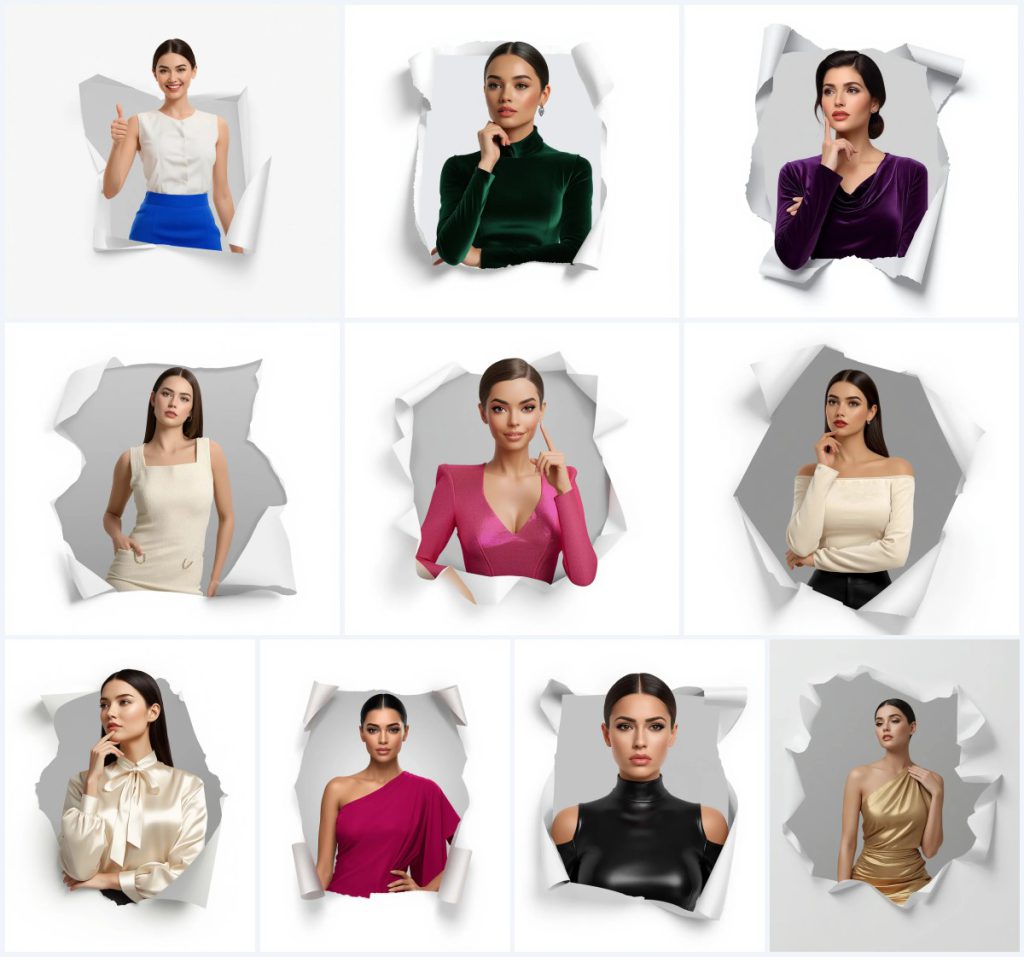
Prompts Love collects AI image prompts that people actually want to type into a generator, and this set is a good example of a very specific visual idea repeated across ten cards. The shared scene is a polished 3D render of a woman pushing out through a torn paper hole, framed chest-up in a 4:5 vertical crop, against a locked pure white background.
The cards change her outfit and expression: a cobalt blue mini skirt with a thumbs-up, a dark green velvet mini dress, a dark purple velvet gown, cream tweed, metallic pink, cream velvet off-shoulder, cream silk, magenta draped gown, black leather-look dress, and gold metallic mini dress. The visual grammar stays the same, which makes the set easy to learn from.
What this torn paper hole portrait set is asking for
Every card in this set describes the same core construction: a beautiful woman rendered as an ultra-clean, high-resolution, sharp, polished 3D render, with her facial identity held consistent across frames. She emerges through a torn paper hole, and only her chest-up is visible inside a 4:5 vertical frame. The background is a single cool, crisp pure white, and the lighting is soft studio lighting with no harsh shadows.
- A torn paper hole with realistic ripped edges wrapping around her half-body
- A subtle light grey gradient inside the paper hole behind her
- A 4:5 vertical aspect ratio framing only her chest-up
- Soft studio lighting with even, clean highlights and no harsh shadows
- A locked pure white background with no gradient or color shift
- Outfit and expression variations such as a cobalt blue mini skirt, dark green velvet mini dress, cream tweed mini dress, metallic pink midi dress, and gold metallic mini dress
The scene inside the paper hole
The picture is built around a single physical trick. The prompt asks for a woman who "appears to emerge through a torn paper hole, with realistic, ripped edges wrapping naturally around her half-body, creating a palpable 3D popping-out effect against a subtle light grey gradient inside the paper hole." That torn edge is the whole illusion, so it needs to look like paper and not a soft digital mask.
Around that hole, everything else is deliberately plain. The prompt locks "a single cool, crisp pure white" background and uses "soft studio lighting, even and clean, casting no harsh shadows and providing smooth highlights." The outfit cards then change the mood: a thumbs-up in a cobalt blue mini skirt, a thoughtful pose in a dark purple velvet gown, a wink in a metallic pink midi dress, and a cool stance in a gold metallic mini dress.
Why this prompt set works so well
This set works because it gives the model one strong physical idea and then repeats it with small, controlled changes. That makes it useful for testing a generator rather than just making one lucky image.
- The torn paper hole is a clear, readable prop, so you can immediately see whether the model understood the geometry of the scene.
- The 4:5 vertical crop and chest-up framing keep the composition consistent, which makes outfit and expression changes easy to compare.
- The pure white background and soft studio lighting remove distractions, so any flaw in the face, hands, or fabric stands out right away.
Three styles that stay inside this prompt
You can push this prompt in three directions, and all three stay inside the torn paper hole idea rather than turning it into something else. The set already mixes a polished 3D render look with portrait lighting, so the styles below are variations on that same construction.
- Glossy 3D render: Lean into the ultra-clean, high-resolution, sharp, polished 3D render wording and keep surfaces smooth, with the torn paper edges crisp against the pure white background.
- Soft studio portrait: Follow the soft studio lighting, even and clean clause and let the face carry the frame, with gentle highlights on velvet, silk, or tweed.
- Playful editorial: Use the expression cards, such as the thumbs-up in a cobalt blue mini skirt or the wink in a metallic pink midi dress, to give the render a light magazine mood.
How to run these prompts without wasting generations
The workflow is simple, but the order matters. Copy one card at a time, keep the shared scene wording intact, and change only the outfit and expression line for that card.
- Copy the prompt. Paste one full card from the set into your generator, keeping the torn paper hole, 4:5 vertical, and pure white background clauses exactly as written.
- Upload a reference. If you want a specific face, upload a clear reference photo and mention that the facial identity should stay consistent across frames.
- Generate. Run a small batch of four images first, using the same seed if your tool supports it, so you can compare outfit and expression changes fairly.
- Check hands. Even chest-up frames sometimes show a hand, especially the thumbs-up card, so zoom in and look for extra fingers or a melted wrist.
- Check face. Confirm the face matches your reference and that the expression, such as the wink or the serious look, reads clearly rather than as a squint.
- Check the main object. Inspect the torn paper hole itself, because the ripped edges and the light grey gradient inside it are the main object of this scene and the easiest thing to get wrong.
Choosing a reference photo for the paper hole render
A reference photo is optional for this set, but it helps a lot when you want a consistent face across the ten cards. Pick something clean and front-facing so the model has the least to guess about.
- Use a sharp, well-lit photo with the face clearly visible and not tilted too far to one side.
- Avoid heavy filters, sunglasses, or hair covering the eyes, because the prompt depends on readable expressions like the thumbs-up smile or the wink.
- Keep the shoulders visible in the reference, since the render is framed chest-up and the torn paper edges need to wrap around the upper body.
Which tools handle this prompt best
Not every generator treats a torn paper hole the same way. The table below compares the tools people commonly use for this kind of polished render, based on how well they follow layered scene instructions.
| Tool | Access | Typical realism | Useful here for |
|---|---|---|---|
| ChatGPT | Web and app, paid tiers for image generation | Good to very good, strong prompt following | Rewriting a card so the torn paper hole and the 4:5 vertical crop stay in one clean instruction. |
| Google Gemini | Web and app, free and paid tiers | Good, improving quickly | Quick drafts of the thumbs-up cobalt blue mini skirt card before you commit to a longer render pass. |
| Leonardo AI | Web, free credits and paid plans | Very good for polished 3D render looks | Testing the dark green velvet mini dress and cream tweed cards with the same seed for comparison. |
| Midjourney | Web and Discord, paid subscription | Excellent texture and lighting | Getting realistic ripped paper edges and the light grey gradient inside the paper hole. |
Small tips that make the torn paper illusion hold
The details that sell this set are physical, not decorative. Keep the materials and the paper edge consistent, and the render will read as one deliberate construction.
- Describe the paper itself, including the ripped edges and the light grey gradient inside the hole, so the model does not turn it into a soft vignette.
- Match fabric language to the card you pick, such as velvet for the dark purple gown or tweed for the cream mini dress, because those words change how light sits on the shoulders.
- Keep the background locked to a single pure white, since any color shift behind the paper hole breaks the clean studio look.
Common failures and what to change
Most problems with this set come from the model flattening the paper hole or drifting away from the strict framing. The fixes are usually small wording changes rather than a full rewrite.
| Issue | What to change |
|---|---|
| The torn paper edges look like a soft blur or a digital mask | Repeat the words realistic, ripped edges and ask for visible paper fibers around the hole. |
| The background picks up a grey or blue tint | Reinforce the single cool, crisp pure white background and add that it is locked without gradient or color shift. |
| The frame drifts to a square or wide crop | State the 4:5 vertical aspect ratio again and remind the model that only her chest-up is visible. |
| The face changes between images in the batch | Add the identical facial identity and features across all frames clause and use a reference photo plus a fixed seed. |
Frequently Asked Questions
Do I need to use a reference photo for these paper hole portraits?
No, but it helps. The cards ask for identical facial identity and features across all frames, so a clean front-facing reference photo makes that much easier to hold when you generate several outfit variations.
Which card is easiest to start with?
The cheerful woman giving a thumbs-up in a vibrant cobalt blue mini skirt is a good first test, because the gesture and the bright color make it obvious whether the model followed the expression and outfit instructions.
Why does my render lose the torn paper effect?
The torn paper hole is the hardest part of the scene. If it turns into a soft edge, add wording about realistic ripped edges wrapping naturally around her half-body and about the light grey gradient inside the paper hole.
Conclusion
This set is really one strong idea repeated ten times: a polished 3D render of a woman emerging through a torn paper hole, chest-up in a 4:5 vertical frame, on a locked pure white background. The outfit cards, from the cobalt blue mini skirt to the gold metallic mini dress, give you just enough variation to test a generator properly. Copy one card, keep the shared scene wording intact, and check the paper edge, the face, and the hands before you move on to the next one.
Only edit and upload a reference photo that you own or otherwise have the right to edit.